Planning a Halloween party? Make these spooky spider bags so your guests can take home their treats in style.
1.
Halloween parties are lots of fun! To send holiday haunting fun home with your guests, create these Halloween treat bags with brown paper lunch bags. Make enough for all your guests. They're great for table decorations, too!
2.
Cover your art area with recycled newspaper. Crumple the bags well. Dilute black Crayola® Washable Kid's Paint with water. Stand over a sink and pour the diluted paint over the bags. Rinse crumpled bags well. Set aside to air dry in a warm breeze.
3.
Fill the dry bags with holiday treats. Tie a few strands of raffia and a short length of black yarn around the bags' tops. Use Crayola Gel Markers to draw a large spider web on each bag. Air dry.
4.
Add a few drops of Crayola Glitter Glue to the webs to look like droplets of water. Air-dry the glue.
5.
Use Crayola Model Magic compound to sculpt spiders for your treat bags. Shape a round abdomen and a scary face. Ask an adult to help you use Crayola Scissors to cut four chenille stems in half for each spider. Push the stems into spiders' bodies, so the legs are an equal length on each side. Bend the stems so they look like legs.
6.
Use a Crayola Colored Pencil to push a hole into the spider's abdomen. Tie a knot in the end of the black yarn connected to the bag. Poke the knot into the spider's abdomen. Pinch the Model Magic closed around the yarn to attach the spider to the bag.
7.
Paint your spider with a Crayola Paint Brush. Set it away from the bag as it dries. Add details to your spider with Glitter Glue and Gel Markers. Air-dry the sparkles. You're ready to party!
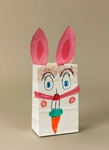
Easter goodies hop right into these handcrafted Bunny Bags. Kids hop at the chance to make their own party favor!
Black cats are a hauntingly good way to decorate for Halloween. Kids jump to create this Black Cat Window Watcher with g
Make your own cobwebs to hang in the corners! This cute critter is a Halloween decoration that could dangle in any room
Hippity hop! These nifty rabbits jump right into the hearts of everyone they meet! Best of all, they’re easy enough for
Greet your Halloween guests with this spooky spider door decoration! Kids will really get the hang of this scary holiday
Plan a pretend pickled egg picnic! Fill a colorful container with decorated eggs. Crayola® Color Wonder™ Markers color o
It only takes a few simple shapes and a bit of imagination to make this gorgeous pin to celebrate the season!